Wednesday, October 31, 2018

How to Delete Facebook Comments attached to your Account

By With No comments:
How to Delete Facebook Comments attached to your Account: Writing comments on your friend’s posts or pictures sounds fun until you realize you have mistakenly sent just one comment several times due to bad network connectivity or you have unintentionally added a bad phrase which might cause a chaos on Facebook.  
You know you have an option to remove those comments as soon as possible but what you don't know is how it is done. Just keep your calm, this article will take you through the ways comments can be deleted on Facebook.

The steps though gives same result is a bit different depending on the device you are using to surf Facebook, so I will endeavor to go through using PC and Android to delete comment on Facebook

From Facebook Website for PC
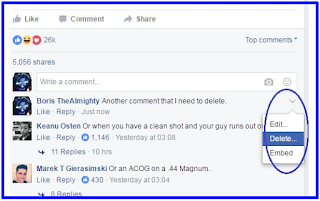
  • Go to the post you commented on
  • Then to your comments
  • Place you cursor on the comment and then click on the arrow to the right pointing downwards
  • From the drop-down list, select "delete"
  • You can as well change your mind and decide to edit the comment instead, click "edit" then change whatever you want to change and post.
                               

Read Also: How to Clear all Facebook activities from Facebook Log
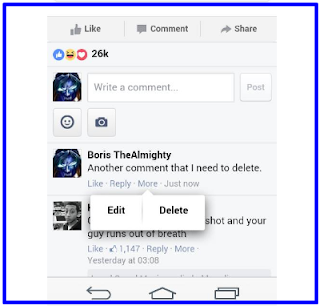
From Facebook Application for Android
  • Go to the comment you wish to delete
  • Tap "more" which is just below the comment
  • From the pop-up menu, choose "delete" option
  • Just like the PC, you can also decide to edit your comments by tapping "edit".
                                 
You see how easy it is to delete comment on Facebook, so don't waste much time thinking of your grammatical errors, you can delete it or edit it to correct yourself as soon as you notice it.
Kindly share this with your friends so they can also learn how to immediately remove mistake from comments or even the whole comments.
Read More

Facebook Lite Download - FB App APK

By With No comments:
Facebook Lite Download | FB App APK: This particular Facebook app will help you in browsing Facebook faster especially in a low bandwidth location.  Even if you have a strong network signal for accessing your Facebook, you may still want to reduce the data cost by your mobile carrier.

Facebook lite app gives you the basic Facebook experience with no distractions and preserves your data for other useful things. See: Facebook Download for Android & iPhone

The new feature in Facebook allows you to post your stories that will last only for 24 hours. And then they will be automatically deleted. And this feature is very similar to Snapchat Stories feature. And click here to know How to Download Snapchat Stories. While coming to the topic, in this post you will see Facebook Lite Apk Download.

Steps for Facebook Lite Apk Download

Facebook Lite Download | FB App APK


What is Facebook Lite and Why it is so popular?

Facebook Lite is also a similar application like Facebook where you can open your Facebook account. It is very popular because it takes less amount of data and also takes less storage space. But you can have everything in this Fb Lite app, that Facebook app has. In this FB Lite app, you can upload your photos, videos and much more. You can also see Newsfeed and you can also see who are online and you can chat with them. Most of the people who are having less storage space in their mobiles will use this FB Lite app.

Steps for Facebook Lite Apk Download For Windows PC

If you want to know How to download Facebook Lite Apk For Windows then follow the below guide carefully.
  • To download this app, first of all, you need an Windows smartphone with the Internet connection.
  • Then switch on the wifi of mobile data in your Windows device.
  • Sometimes you may not be able to download this app in the App store.
  • Then you have to download the app through FB Lite apk.
  • So you have to open the browser in your mobile.
  • And in the search tool box, you have to type Download Facebook Lite apk For Windows.
  • And click on the search option.
  • You will see many results on your screen.
  • Click on the Facebook Lite apk For Windows latest version to download it.
  • After the download completes, you have to open it to install the app
  • And you can open it to have FB Lite login and use it.

Other related terms for FB Lite Apk Download For Windows include:

  • facebook lite windows 7
  • facebook lite windows 10
  • facebook lite for windows mobile
  • facebook lite for lumia
  • facebook lite for microsoft lumia 535
  • facebook lite for nokia lumia
  • sdk lite windows phone 8.1 download
  • facebook lite for windows 8
  • facebook lite for pc online
  • facebook lite for pc filehippo
  • facebook lite exe
  • facebook lite for laptop
  • facebook lite for windows phone

Steps for Facebook Lite Apk Download For Android

If you want to know How to download Facebook Lite Apk For Android then follow the below guide carefully.
  • To download this app, first of all, you need an Android smartphone with the Internet connection.
  • Then switch on the wifi of mobile data in your Android device.
  • Sometimes you may not be able to download this app in the Play store.
  • Then you have to download the app through FB Lite apk.
  • So you have to open the browser in your mobile.
  • And in the search tool box, you have to type Download Facebook Lite apk For Android.
  • And click on the search option.
  • You will see many results on your screen.
  • Click on the Facebook Lite apk For Android latest version to download it.
  • After the download completes, you have to open it to install the app
  • And you can open it to have FB Lite login and use it.

Related terms for those searching for "Download FB Lite" are as follows:

  • Facebook Lite for Android
  • Download Facebook Lite for Android
  • Facebook Lite APK Download for Android
  • Facebook Lite APK for Android
  • Download Facebook Lite Free for Android

Steps for Facebook Lite Apk Download For iPhone | iOS | Mac | iPad

If you want to know How to download Facebook Lite Apk For iPhone then follow the below guide carefully.
  • To download this app, first of all, you need an iPhone smartphone with the Internet connection.
  • Then switch on the wifi of mobile data in your iPhone device.
  • Sometimes you may not be able to download this app in the iTunes.
  • Then you have to download the app through FB Lite apk.
  • So you have to open the browser in your mobile.
  • And in the search tool box, you have to type Download Facebook Lite iPhone.
  • And click on the search option.
  • You will see many results on your screen.
  • Click on the Facebook Lite apk For iPhone latest version to download it.
  • After the download completes, you have to open it to install the app
  • And you can open it to have FB Lite login and use it.

    See: Deactivate and Delete Facebook Account

     
    Hope this as helpful for installing Facebook lite app on your device. Enjoy!!


    Searches related to FB Lite Apk for iPhone:

    • facebook lite app store
    • download lite iphone
    • fb lite for iphone 4s
    • facebook lite for iphone 6s
    • facebook lite para iphone
    • facebook lite for ios 9
    • facebook lite ipa
    Read More

    How Can I Go Live on Facebook?

    By With No comments:
    How Can I Go Live on Facebook: How do I go live on Facebook? If you are wondering How to Go Live on Facebook then worry no more because we are here to help you figure out to go Live on Facebook regardless of your device type. You should also keep in mind that depending on what device you are using, going Live on Facebook steps and requirements may differ a bit. But Facebook live much more easier via mobile device users.

    How Can I Go Live on Facebook?


    How to Go Live on Facebook Via Your Desktop

    To go live on desktop Facebook:
    1. Click Live Video at the top of your News Feed
    2. Write something about your live video
    3. Click Go Live
    Note: Use the Google Chrome web browser to go live from your computer.
    To go live:
    1. Tap What's on your mind? at the top of your News Feed
    2. Tap Live Video
    3. Write an optional description and tap Go Live
    4. Tap Finish when you want to end your broadcast
    You can also go live in a group or event by tapping Write Something or Say Something and then tapping the Live icon.

    Note: You can block viewers during a live broadcast by tapping the profile picture next to a viewer's comment and then tapping Block.

    This post appeared here first:
    How to Go Live on Facebook - Step by Step
    Please share this article with your Facebook friends so they also learn what you know. Sharing is caring!!!
    Read More

    How to remove phone number on Facebook

    By With No comments:
    When you opened your Facebook account, you were asked to supply your phone number to get a confirmation code to complete your registration process and you did. But unfortunately, that phone number is being taken out of Facebook by anyone and everyone, calling you. At times, people you were avoiding on Facebook decide to call you and it makes you restless. The good news is that you can remove that phone number from Facebook and get back your peace of mind. Shortly, we will be showing you how to remove phone number on Facebook.

    READ ALSO: How To Change Phone Number To Email On Facebook

    How to remove phone number on Facebook


    On Your Facebook Application:
    1. Click on the menu button at the top right hand of the Facebook page
    2. Scroll down and tap on "Account settings"
    3. Tap on "General"
    4. Tap on "Phone"
    5. Tap on "Remove from your account" (under "Current phone numbers")
    6. You will be asked if you are sure of the removal process, type in your password then you tap on "Remove phone"

    On Your Browser:
    1. Click in the top right corner of Facebook
    2. On the drop down menu, click on "Settings"
    3. On the left hand side of the screen, click on "Mobile"
    4. You will be asked if you are sure you want to remove the phone number, click on "Remove phone"
    5. Enter your password and click on "Submit"

    READ ALSO: How to change your email address on Facebook

    Read More

    How to unblock Facebook friends

    By With No comments:
    Have you blocked some of your friends on Facebook intentionally or unintentionally? Don't worry, you can unblock them whenever you choose. Blocking friends simply means that those friends have been forbidden from seeing your timeline, sending you messages, etc. Most people actually disturb their friends a lot, hence the reason for the action: Blocking. So, let's say that you've had a change of heart and you want to unblock them, here's how to go about it:

    How you can unblock Facebook friends?
    On Your Facebook Application
    1. Tap on the menu button on the top of your Facebook page
    2. Scroll down to Account Settings
    3. Tap on "Blocking"  to show you a list of your blocked friends
    4. On the extended right of the name of the person you want to unblock and tap on "Unblock"
    5. On the screen that pops up, you will be asked if you are sure you want to unblock the person, tap on "Unblock"

    Check out:
    On Your Browser 
    1. Click on    in the top right of your Facebook page
    2. Click on "Privacy Shortcuts"
    3. Click on "How do I stop someone from bothering me?"
    4. Click on "View All Blocked Users"
    5. Click on "Unblock" next to the name of the person you want to unblock.
    6. On the pop-up screen, you will be asked if you want to unblock the person, click on "Confirm" at the bottom of the pop-up screen to unblock that Facebook friend.
    If you run into any snags or encounter any problems, do let us know via the comment section.
    Remember to hit on the share buttons.
      Read More

      Tuesday, October 30, 2018

      Facebook's follow me - A bizarre hoax

      By With No comments:
      Have you been on Facebook over the last couple of days? Then you have probably seen some version of this chain message going around:
      "If you go into your ACCOUNT SETTINGS then to BLOCKING (on left side of screen), then in the BLOCKED USERS search bar type in “following me” without the quotes, you might be startled by who is following you. Unfortunately you have to block them one at a time, which is annoying. I had twenty in the list and knew none of them. I blocked all of them. You might share or copy/paste if you found this helpful".
       Facebook's follow me- A bizarre hoax

      Like so many things on Facebook, it’s totally untrue. It is true that if you input “following me” into the search bar you would otherwise use to block people, a string of seemingly random and irregular people will come up. But unlike what the perpetrators of this hoax may want you to think, these accounts don’t belong to some secret network of spies — neither are they part of a grand conspiracy on the part of Facebook. Rather, they’re just the unfortunate victims of a search function that was grossly misused.

      They are definitely not stalking you!

      Here’s why: When you search “following me,” Facebook doesn’t show you who is actually following you. (If you actually want to see that list, you have to click on the Followers section under your Friends List.)

      Searching this term on your Block page pulls up a list of users whose names and general information match the terms following and me as closely as possible. And though you see the names of all of the corresponding users, what you don’t see is all of the hidden and private information Facebook derives its matches from — like nicknames, “About Me” descriptions, and employment information. And that’s what the list is actually being generated from.


      See also:

      Unfortunately, however, everyone who has fallen for this hoax is pulling up this list, and many of them are desperately contacting the people on it, demanding to know why they’re being followed. For the most part, the people who match these criteria are unfortunate random people who are made to bear the brunt of this cruel joke - most of whom have their Facebook accounts locked down. But there’s another category of people who appear on the now-infamous list: fun-seeking trolls.
      The trick is that, since Facebook's updated version allows you to add a nickname, most people add "following me" to their name. When this is done, typing ‘following me’ into the block-people list would show you nothing but random folks.

      Soon after changing your nickname, your inbox will be flooded with thousands of messages from people asking who you are and why you are following them.
      Being exposed to the brunt of a Facebook hoax’s power is apparently pretty harrowing. Quite a few voluntary members of the “following me” list quickly removed themselves after finding their inboxes flooded with messages.
      Read More

      Monday, October 29, 2018

      Delete Facebook Page | Delete My Page On Facebook - Remove Business Page

      By With 1 comment:
      Delete Facebook Page | Delete My Page On Facebook - Remove Business Page: Facebook business page deletion is done same way as deleting a normal brand, organization or company page. You can delete your Facebook business page at any time regardless of how many likes you've accumulated but mind you, when you delete your Business page, everything concerning your business page will be lost - so you might want to think it over and over again before you proceed to delete your Facebook business page. Learn How to Hide Pages You Follow on Facebook

      Delete Facebook Page | Delete My Page On Facebook - Remove Business Page

      How to delete a Facebook Business Page Permanently and Immediately


      If you have fully made up your mind to let go of your Facebook account, then you must check to see that you are the admin of the page you plan to delete, you'll need an admin login privilege of that particular page you wish to get rid of. If you are sure you own that page, then follow the steps underlined below to easily remove your Facebook page.


      How to remove a Facebook Page

      1. Click Settings at the top of your Page
      2. From General, click Remove Page
      3. Click Delete [Page name]
      4. Click Delete Page and then click OK
      Also keep in mind your Page won't be permanently deleted until 14 days has elapsed, but you can unpublish your Page at any time.

      How to cancel or Undo Facebook Page deletion

      Follow the tips below to cancel your Facebook page deletion:
      1. Go to your Page within 14 days of scheduling to delete your Page
      2. Click Cancel Deletion at the top of your Page
      3. Click Confirm and then click OK
      Note that you can also delete your personal Facebook account.
      Note: In the case where you can't find the delete option on your FB Page, make certain that you're truly an admin of that Page. 
      Is this guide still confusing or you find anything hard to do? Please leave us with a comment describing the problem or read these guides:
      Please share this article " Delete Facebook Page | Delete My Page On Facebook - Remove Business Page " on Facebook. Thank you so much!
      Read More

      How to create a private event on Facebook on iPhone

      By With No comments:
      iPhone users, we are back again! Just as we promised, we have delivered! Check out how to create a private event on your iPhone both on your Facebook application and browser. If you are using an Android phone, don't worry, we've still got your back. Check out this article: How do you create a private event on Facebook?


      How to create a private event on Facebook on iPhone

      On Your Facebook Application:
      1. Tap on the menu button at the bottom of your Facebook page
      2. Scroll down and tap on "Events"
      3. On the top right-hand corner of the page, tap on "Create"
      4. Under "Create Event", you will see that its already set to "Private"
      5. Fill in the "Event title" and give your event a name
      6. Add "Location"
      7. Fill in the "More info" to give people more information about your event
      8. Swipe left or right to allow or disallow guests to invite friends
      9. Tap on "Co-hosts" to add friends as co-hosts to the event
      10. When you are done, tap on "Create" at the top right hand corner of the page.
      On Your Browser:
      1. Tap on the menu button at the top right-hand of the Facebook page
      2. Tap on "Create Event" (on top of "Upcoming Events")
      3. Looking at the bottom of the pop-up screen, you will see that it is already set to "Private Event", so go ahead and tap on "Event title" to give your event a name
      4. Tap on the date and time displayed to select the beginning "Date and Time", and "End date and Time" then tap on "Done" at the top of the page to return to the previous page where you were creating your event
      5. Tap on "Location" to add the location of the event
      6. Tap on on "Tell people more about the event" to give more information about the event 
      7. Tick or untick "Guests can invite friends" to allow your invited guests to also invite their friends to the event
      8. Tap on "Create" at the top right hand corner of the page to create the event after you are done
      Simply simple!
      Remember to hit on the share buttons!
        Read More

        How to create a public event on Facebook

        By With No comments:
        Do you know you can create a public event on Facebook and invite your friends? Here's how to do it:
        How to create a public event on Facebook

        ON YOUR FACEBOOK APPLICATION:
        1. Click on the menu button at the top right-hand of your Facebook page
        2. Scroll down and click on "Events"
        3. Click on the blue button at the right-hand bottom corner of the page
        4. On the top of the page, tap on the drop-down button to choose between a "Private" or "Public" event (the default setting is "Private event" so tap on it and change it to "Public event")
        5. Add photo
        6. If you are an admin in any page, you can allow the page to stay as the "Host", (the page will automatically appear as host), if you decide otherwise, just tap on "Host" to change it to your preference
        7.  Fill in the event name, time, location, details, and ticket URL
        8. Tap on "Co-hosts" to add friends as co-hosts to the event
        9. Tick and untick the two boxes that says "Only admins can post to the event wall" and "Posts must be approved by admin" to suit your preference
        10. Hit on "Publish" after you are done.

        See also:

        View Your Blocked Facebook List and Unblock Friend
        How to report a child under the age of 13
        How to change phone number to email on Facebook

        ON YOUR BROWSER:
        1. Click on "Events" in the left menu of your News Feed
        2. Click on "Create Event" in the top right
        3. On the drop down menu, click on "Public event"
        4. Tap on "Event Host" to select the page or profile that will host the event (if you are an admin in any page, you can allow the page to stay as the "Host" as the page will automatically appear as host)
        5. Fill in the "event name", "location" and "date/time"
        6. Fill in the "Details":- "description" to give people more information about the event and "keywords"
        7. Fill in the "Ticketing URL" under "Tickets" Here, you will add a link to your ticketing website where people can get the ticket to attend your event
        8. Under "Options", choose who can edit and post in the event, also add your friends and other pages to be "Co-hosts".
        9. You can choose whether or not to display the guest lists by ticking or unticking the "display guest list" box.
        10. Click on "Create" after you are done to create your event. You can also schedule your event to be created at a later date by clicking on the drop down menu (close to "Create")
           
        Read More

        Facebook follow me - the new hoax

        By With 2 comments:
        There's a new hoax on Facebook that is scaring users into believing that they are being stalked from unknown persons. Some of the users of the social media platform are spreading the myth that a hidden list could expose your unknown "followers".
        Facebook follow me- the new hoax

        These followers could effectively be secretly stalking you, all your statuses and updates.
        According to the rumor currently making rounds on the social media platform, Facebook would show you a list of people if you go to the block section of settings and type in “following me”.
        Unfortunately, this idea is nothing but a gimmick - and an old one at that!
        Despite the fact that it is a ruse, a message is spreading across the Mark Zuckerberg-owned website - and people are getting scared.

        See also:


        Experts have debunked the whole thing as nothing but a ruse to scare people, though.
        The hoax has done the rounds previously, but is seemingly picking up serious popularity this week.
        When you type something (a word) into the "search bar" on Facebook, it is going to find ANY and ALL pages, people, and/or posts with those words in them.
        What you're probably seeing is a list of people with names that include letters from the words "following" and "me."

         So how can you find out how who really is following you?

        According to Facebook’s Help Center, you go to the right corner and select settings, then click public posts, then select friends or public next to who can follow me to see your genuine followers so there is no reason why Facebook would implement a feature that would allow users to see their paid stalkers or “covert followers”, it would seem oddly counter-productive. Regardless, this sensible flaw hasn’t seemed to stop these rumors from going viral, regularly.

        Read More

        I Caught You On My Facebook Profile

        By With No comments:
        I Caught You On My Facebook Profile: It's is very possible to catch other Facebook users checking your Facebook profile page, though Facebook itself didn't add up this feature to their site, there are two major techniques developed to do this function with ease. It can be done through downloading and installing Google chrome expansion add-on or by using the coded information on the page resources, whichever one you use, you will definitely catch those checking out your Facebook profile.

        Chrome expansion add-on
        1. First you have to download and install profile site visitors add-on to your chrome browser
        2. Then visit your profile with this browser and you will notice a new tab added, the visitor's tab, this will reveal to you those that checked and presently checking your profile anytime you want to. This tab is just beside the friends tab, it is extremely easy to locate.

        Coded information on page resources
        • You can use this technique when you can download Google chrome browser add-on.
        • While using chrome browser too, log in to your Facebook account and long click a place on the screen, from the options brought choose web page resources 
        • Then series of coded Information are displayed, enter ctrl+f and search for "initialchatfriendslist" 
        • Copy the coded information separated by inverted comas after the word you searched
        • Then paste it behind www.facebook.com/ and send
        • The profile shown is that of the person who viewed your account
        I hope you have gained from reading this article, kindly share to your buddies, so that can learn to catch those checking their profile.
        Read More

        App for Facebook Messenger

        By With No comments:
        App for Facebook Messenger: Facebook Messenger is the messaging platform of Facebook - historically messaging and keeping in touch has been the major goal of the Facebook system, with the App for Facebook Messenger it has led communications on the platform to another level as users can now message each other with ease and sole focus on the messaging aspect of the platform, No wonder with this recent update, Facebook now has more than 700million users. 

        App for Facebook Messenger
        Facebook Messenger (in some cases abbreviated as Messenger) is a messaging application and also platform Initially established as Facebook Conversation in 2008, when Facebook overhauled its messaging service in 2010, it subsequently released a standalone iPhone and also Android applications in August 2011. Throughout the years, Facebook has launched brand-new applications on a range of different operating systems, launched a devoted website user interface, and separated the messaging feature from the main Facebook application that merely require users to use the internet user interface or download the standalone apps to message their loved ones and friends.

        In Facebook messenger, users can send out messages and exchange pictures, videos, stickers, sound, and also documents, as well as react to other customers' messages and connect with crawlers. The service also supports voice and video calling.


        Instantly connect with the people in your life. Messenger is totally free, quick, and it is safe. Other benefits and features of the Facebook messenger app includes:

        • Reach out to any person: You can make use of names or telephone number to locate pals.
        • Used everywhere: Messenger functions throughout all mobile as well as desktop computer devices. You can even connect with individuals internationally!
        • You can do several things: Send out a text, share an image, or start a video chat-- done in Messenger.
        • Communicate much better with groups: Catch up in real time with premium quality team video clip chat or personalize your messaging experience with colors, nicknames, and group photos.
        Check Out: The Best Facebook Quizzes
        • Call as well as do video clip conversation your friends 1:1 or in groups: It's complimentary over Wi-Fi (or else conventional data fees needed), so speak as long as you want, even with individuals in various other countries.
        • Express on your own using custom message features: Send out emojis, stickers, and also GIFs to conversations or add brand-new masks and results to your video clip chats.
        • Capture photos as well as video clips with fun art and effects: You can save these to your device’s gallery, send out in conversations, or article to your Day, an area where people can see just what you're up to.
        • Play games and compete with your buddies: You can contrast scores as well as see just how you rank against other people in social games available on the platform.
        • Chat and promote your businesses: You can make reservations, look at orders, and also give real-time customer care support.
        I hope this overview on Facebook Messenger was helpful. Please share it with your friends and get back to us in the feedback section if you face any challenge.
        Read More

        Delete my Faceɓook account Permanently

        By With 4 comments:
        Okay, you want to delete your Faceɓook account right? Have you made up your mind to loose all your Facebook friends? Have your prepare a storage to backup all your photos and videos that you have posted on Facebook, have you also made up your mind to loose all pages, groups and connections you have made on Facebook?


        Sometimes, we make irrational decisions only to regret at last. I want to be sure that you have everything in place before you proceed to delete your account. If you are ready then let's get started in helping you to delete your FB account.

        If you have not yet made up your mind, perhaps, deactivating your Facebook temporarily might be an option.


        Delete Your Faceɓook account Permanently


        You can delete your Facebook account permanently by following the steps bellow:

        Good bye from Facebook. Cheers!
        Read More

        How do I add a family member to my About page?

        By With 1 comment:
        How do I add a family member to my About page?: Adding your family to Facebook about page is quite easy. Let's see how to go about it:


        How do I add a family member to my About page?

        How to  add my family members to my Facebook About page

        To add a family member to your About page:
        • Go to your profile and click About. 
        • Click Family and Relationships, then click Add a family member. 
        • Enter the name of your family member and select your relationship. 
        • Select an audience for your post and click Save Changes. 


        To add a partner to your About page, you can change your relationship status.


        Note: If you list a Facebook friend as your family member, that person will be asked to confirm your relationship.
        Read More

        How to create a list to organize my Facebook friends

        By With No comments:
        How do I create a list to organize my friends? - You can use lists to organize your friends on Facebook. Using a list, you can filter the stories you see in your FB News Feed or post an update for specific people, like your coworkers or friends who live near you.

        How to create a list to organize my Facebook friends

        How to create a list to organize my friends on Facebook


        To create a new list:
        • Click Friend Lists under Explore on the left side of your News Feed.
        • Click Create List.
        • Enter a name for your list and the names of friends you’d like to add. Keep in mind you can add or remove friends from your lists at any time.
        • Click Create.


        In addition to any lists you create, you'll also see smart lists. Smart lists are automatically created and stay up-to-date based on profile information you and your friends have in common (ex: work, school, family, city).
        Read More

        Saturday, October 27, 2018

        How Do I Delete My Facebook Account | Deactivate My Facebook Temporarily

        By With No comments:
        welcome to our How Do I Delete My Facebook Account | Deactivate My Facebook Temporarily post for 2018.
        Facebook doesn’t make it easy, but it is possible. Follow our steps and you’ll wave goodbye to friends, pokes and annoying game invitations for good
        Step 1: Deactivate Facebook
        Facebook deactivate account
        If you want to try life without Facebook for a bit and see how it suits you, you can deactivate your account instead of deleting it for good.
        When you deactivate your account, your Timeline and all information associated with it disappears from the site immediately. No one will be able to find you on Facebook, or see any of your personal information, but the minute you reactivate, it’ll all come back as if it never went away.
        Click the down-facing arrow in the top right-hand corner of any Facebook page, and go to Settings. Click Security in the left column and Edit next to Deactivate your account. 
        Click this link Deactivate your account and follow the steps.
        Step 2: Log out of Facebook-connected sites and apps
        Plenty of websites use Facebook Connect – this is a service that syncs to your Facebook account, so that when you post a comment it will appear on Facebook at the same time. If you want to permanently delete your Facebook account, you’ll have to log out of all these sites that use Facebook Connect first.
        If you see your Facebook profile picture by the comments section on a site, then you’ll need to log out of it. The easiest way to do this is to clear your web browser’s cache, which you can find out how to do below.
        You’ll need to do the same thing with apps – such as Spotify  – on your smartphone.
        Tip 3: Download your archive
        Facebook archive
        If you definitely want to delete your account, it’s worth downloading your archive first. This is a record of posts, photos and videos you’ve shared, messages and chat conversations.
        Click the drop-down arrow – Settings and click General on the left-hand side. Look for the link that says: Download a copy of your Facebook data and you can start the download.
        Tip 4: Find the Delete link
        Facebook delete page
        Facebook doesn’t make it easy to delete your account. You’ll have to find it in the Help Centre – there may be a link buried somewhere on the site, but the easiest way to find it is to Google “Delete Facebook account” or head to http://www.facebook.com/help/delete_account
        Once you’ve clicked the link, you’ll be asked to log into Facebook again and you’ll arrive at the Delete My Account page.
        Tip 5: Confirm the Delete
        Screenshot - confirm Facebook delete
        Click Delete My Account and you’ll be asked to re-enter your password and answer a question to prove you are a human. Then click OK.
        Tip 6: The deletion period
        Once you’ve told Facebook you want to delete your account, you should get an email confirming your choice. This will also let you know that the account deletion process has begun. If you don’t see the email in your inbox, check your junk mail folder.
        It takes up to 90 days for your account to be fully deleted – just in case you change your mind, so don’t log in to Facebook – or any sites or apps that connect to the social network – during that time or your account will be reactivated and you’ll be back to square one.
        Do you use Facebook? Are you tempted to delete your account? Let us know what’s stopping you in the Comments section below.
        Please share “How Do I Delete My Facebook Account | Deactivate My Facebook Temporarily”
        Thanks for dropping by the How Do I Delete My Facebook Account | Deactivate My Facebook Temporarily post. Do share please!
        Read More

        Friday, October 5, 2018

        How to Delete Facebook Photo Albums

        By With 1 comment:
        Previous post featured how to delete Facebook photo so we thought you might wish to entirely remove photo album from your Facebook profile. In this article, we shall see what it takes to get rid of full Facebook photo album you created on Facebook.

        How to Delete Facebook Photo Album


        When I'm done showing you how to delete your Facebook album photo, you will wish to buy me a coffee or sponsor my lunch. But that won't matter right now, since you are too eager to erase everything about this particular Facebook album. So I suggest we get started.


        Please note that you may not be allowed to delete certain Facebook album. For instance,  album tagged as Profile Pictures. I guess the reason is quite clear - it's a system generated album but keep in mind that you can delete photos contained in it.

        See how to delete individual Facebook photo.


        Also keep in mind that as soon as you hit on delete photo album, you will never be able to gain access to that album for eternity. So it's highly advisable to make sure you really want to delete an album.
        Another thing you should know is this - whenever you delete an album, it automatically delete every single image in the album. Be sure you are not deleting the unintended album.


        How to Completely Delete Facebook Photo Album


        To do the deletion, follow the steps below:
        • Go to the album you want to delete
        • Click on the gear icon at the top right and select Delete Album
        • Click to confirm
        Recommended: How to Block friends Apps on Facebook

        It's as simple as that! Please share this article... no longer interested in coffee. Thanks!
        Read More

        How to adjust how adverts are targeted to you based on your activity off of Facebook

        By With No comments:
        How to adjust how adverts are targeted to you based on your activity off of Facebook- We offer multiple ways to control the ads you see based on your activity off of Facebook.
        If you don't want Facebook to use information based on your activity on websites or apps off Facebook for the purpose of showing you ads, you can opt out in your ad settings.
        If you're a registered Facebook user, the choice you make on your browser or device will apply across your devices. If you're not a registered Facebook user, you'll need to make this choice on each browser or device you use.


        On Your browser
        Facebook adheres to the Self-Regulatory Principles for Online Behavioral Advertising and participates in the opt-out programs established by the Digital Advertising Alliance, the Digital Advertising Alliance of Canada and the European Interactive Digital Advertising Alliance. You can opt out from all participating companies through these sites.

        On Your device
        On your iPhone, iPad or Android, you can change your device settings to control whether you see online interest-based ads from Facebook and other companies.
        On your iPhone or iPad:
        1. Go to Settings
        2. Tap Privacy
        3. Tap Advertising and turn on Limit Ad Tracking
        On your Android (versions 2.2 and up) and Google Play Services (versions 4.0 and up):
        1. Go to Google Settings
        2. Tap Ads
        3. Tap Opt out of interest-based ads and tap OK
        Read More
        Copyright © 2018 DSA | All Rights Reserved. Design By DSA